Let me tell you, UTEE is far more than just an embossing
powder. This is one amazing product and definitely one of my all-time
favourites under the Ranger umbrella. The versatility of this single product is
actually mind blowing. You can use it for regular embossing or to make
incredible embellishments using the melting pot. As much as I love all of that
I'd like to share my personal favourite techniques using this product which is
creating backgrounds. I have three effects I'd like to share with you, two of
which don't require a melting pot so sit back and enjoy.
Supplies
UTEE in several colours
Heat gun
Melting pot
Cardstock or triplex board
Toothpick
Marble Background
Step One: For my demonstrations I'm using an ATC size
background base on some recycled cereal boxes cut down to size. Apply embossing
ink to the entire surface area, add UTEE powder and emboss using the black UTEE
with your heat gun. Using the black UTEE as a base provides a great contrast
against the metallic colours I'll be adding. You will need to repeat this step
3 times for a nice thick and solid base.
Step Two: While your black UTEE is still hot start adding
some of your first metallic UTEE which is the platinum in my sample. You need
to only add a very little in small areas around your base. You'll notice that
the UTEE starts melting almost instantly. Use your heat gun to melt any powder
left.
Step Three: Using a toothpick while the embossing powder is
hot and almost liquid like on your base start swirling it around mixing the
metallic powder with the black creating a marble like effect. If you feel it
starting to harden then just zap it with the heat gun again long enough for it
to melt again.
Step Four: You can leave your project as is or you can add a
second metallic colour to the mix as I did using the bronze UTEE powder. Again
swirl the melted bronze powder around with the toothpick creating a multi toned
marble effect....isn't this just gorgeous?
A practical use for this technique would be to alter some
chipboard lettering or shapes. This would make a perfect accent to a layout and
just look at how delicious that marble effect looks.
Drizzled Background
Step One: For this technique you will need a melting pot and
three or four different colours of UTEE. You can use whichever colours you like
according to your own personal taste. Melt just a little of your first colour
in your melting pot and once it's completely melted drizzle it onto your
non-stick craft mat in a random pattern as shown above.
Step Two: If you have project pan then you can go ahead and
use a new pan or simple clean out your pot and add the second colour UTEE.
Again let it completely melt and then drizzle that over the first layer.
Step Three: I added a layer of black in between
steps and then as my final layer used some of the pearl UTEE. Again melt your
UTEE and drizzle over the previous layers.
Step Four: Once the UTEE is completely dry, which only takes
a few seconds, you can lift your drizzle sheet from your craft mat and add it
to your background base. If you're using it on a ATC, card or tag then just cut
down all the excess bits. You can attach it to your base using some gel medium
or a glue that will dry clear.
I made my pattern quite condensed but you can obviously
spread it out more for a less bulky effect.
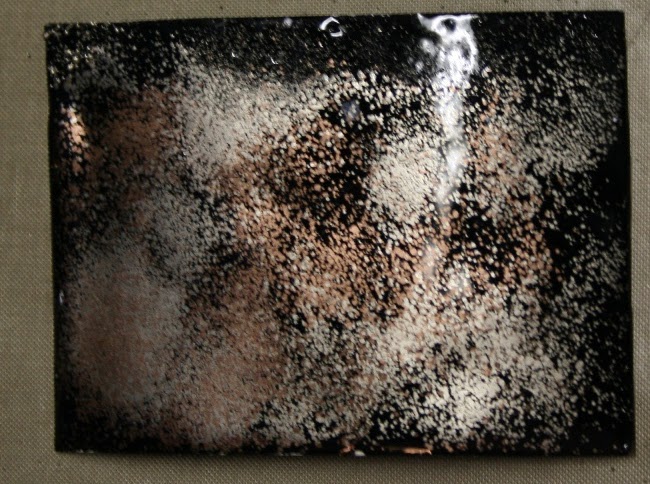
Peaks and Valleys background
Step One: For this
technique you'll need to start with a black base as we did for the first
technique. Three layers will provide a nice thick and solid foundation.
Step Two: Now add two
more colours to the base while the Black UTEE is still hot. Use your heat gun
to melt any excess powder.
Step Three: Now for the fun part, using your heat gun very
close to your project surface and at various angles start blowing the melted
UTEE around so that peaks begin to form. If you use the metallic powders you will
notice how patterns start to form in the direction that you blow the melted
UTEE.
Step Four: Continue doing this until you have created the
pattern you like. It's difficult to show the peaks and valleys in a picture but
if you run your finger across your project surface it will definitely feel the
uneven surface and the patterns make for a gorgeous finish.
These are just three of my favourite background
technique using UTEE. Each has a unique finish and can be adapted to whatever
project you decide to use it on. Chipboard and ATC's deliver some of the best
results. The Drizzle technique is perfect for a layout background too. Mix and
match your colours and above all, have fun.
Here's a layout I did using these techniques on the DA Rustic Frame Set


Wendy, How AWESOME is this tut! Love your technique. I will have to give this a try! Thanks always for the inspiration!
ReplyDeleteAnother AWESOME tutorial Wendy!! Thank you so much for sharing your super creative techniques!! I have UTEE and the melting pot... so I'm off to give this a try!! :) big hugs... Tracy
ReplyDelete